
Introduction-
The DHT11 is a basic, low cost digital temperature and humidity sensor.DHT11 sensor measures and provides humidity and temperature values serially over a single wire.It can measure relative humidity in percentage (20 to 90% RH) and temperature in degree Celsius in the range of 0 to 50°C.It has 4 pins; one of which is used for data communication in serial form.Pulses of different TON and TOFF are decoded as logic 1 or logic 0 or start pulse or end of a frame.


DHT11 is a 4-pin sensor, these pins are VCC, DATA, GND and one pin is not in use shown in fig below
Note-it normally comes with only three pins. The pins should be labeled so that you know how to wire them.
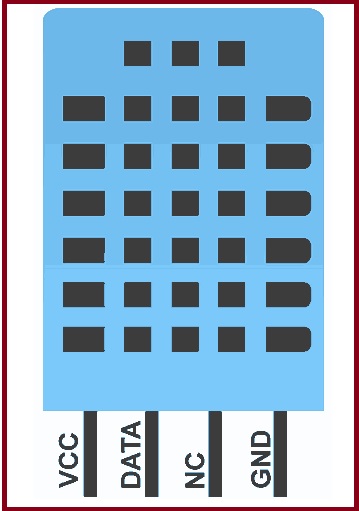
| Pin No. | Pin Name | Pin Description |
| 1 | VCC | Power supply
3.3 to 5.5 Volt DC |
| 2 | DATA | Digital output pin |
| 3 | NC | Not in use |
| 4 | GND | Ground |
What is Relative Humidity?
The DHT11 measures relative humidity. Relative humidity is the amount of water vapor in air vs. the saturation point of water vapor in air. At the saturation point, water vapor starts to condense and accumulate on surfaces forming dew.
The saturation point changes with air temperature. Cold air can hold less water vapor before it becomes saturated, and hot air can hold more water vapor before it becomes saturated.
The formula to calculate relative humidity is:

Relative humidity is expressed as a percentage. At 100% RH, condensation occurs, and at 0% RH, the air is completely dry.
How the DHT11 Measures Humidity and Temperature
The DHT11 detects water vapor by measuring the electrical resistance between two electrodes. The humidity sensing component is a moisture holding substrate with electrodes applied to the surface. When water vapor is absorbed by the substrate, ions are released by the substrate which increases the conductivity between the electrodes. The change in resistance between the two electrodes is proportional to the relative humidity. Higher relative humidity decreases the resistance between the electrodes, while lower relative humidity increases the resistance between the electrodes.
The DHT11 measures temperature with a surface mounted NTC temperature sensor (thermistor) built into the unit.
With the plastic housing removed, you can see the electrodes applied to the substrate:
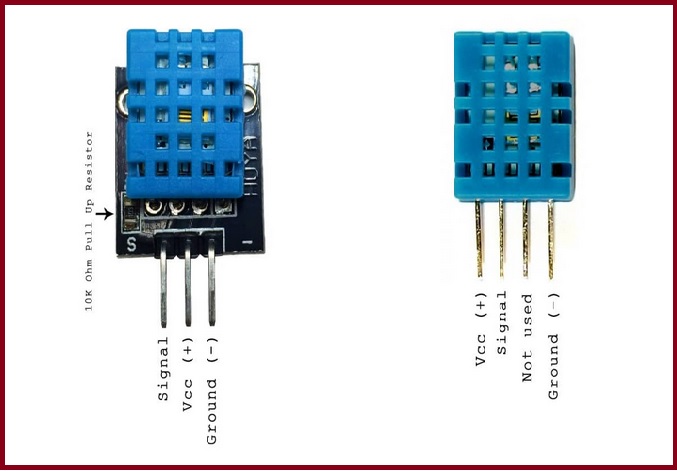
The DHT11 uses just one signal wire to transmit data to the Arduino. Power comes from separate 5V and ground wires. A 10K Ohm pull-up resistor is needed between the signal line and 5V line to make sure the signal level stays high by default (see the datasheet for more info).
There are two different versions of the DHT11 you might come across. One type has four pins, and the other type has three pins and is mounted to a small PCB. The PCB mounted version is nice because it includes a surface mounted 10K Ohm pull up resistor for the signal line. the pin outs for both versions are shown Above:
DHT11 vs DHT22-
The DHT11 and DHT22 are very similar, but differ in their specifications. The following table compares some of the most important specifications of the DHT11 and DHT22 temperature and humidity sensors. For a more in-depth analysis of these sensors, please check the sensors’ datasheet.

Material Required-
we need the following components to interface Arduino with DHT11 humidity and temperature sensor:
- Arduino UNO
- DHT11 temperature and humidity sensor
- Breadboard
- 4.7k Ohm Resistor
- Jumper wires
Schematic –
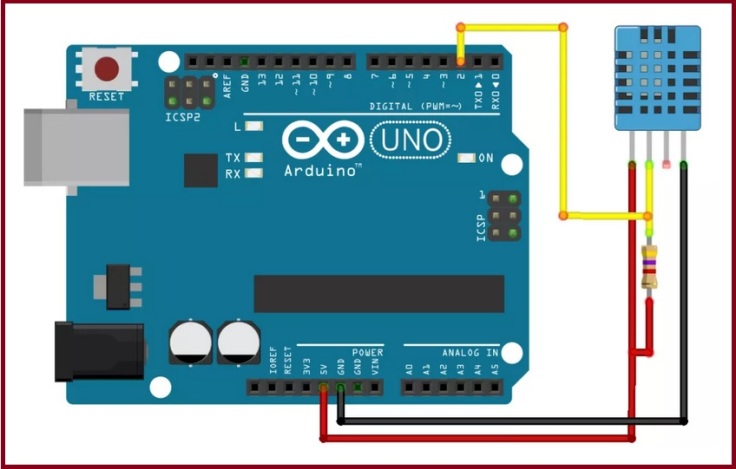
Here are the connections (from left to right) of DHT11:
| DHT Pin | Arduino |
| Pin 1 | 5V |
| Pin 2 | D2 or any other digital pin |
| Pin 3 | don’t connect |
| Pin 4 | GND |
Note: if you’re using a module with a DHT sensor, it normally comes with only three pins. The pins should be labeled so that you know how to wire them. Additionally, many of these modules already come with an internal pull up resistor, so you don’t need to add one to the circuit.
Installing Libraries-
Method 1.-you can download DHT library from below link-
Attach the library in your Arduino library and its done
Method 2-Open your Arduino IDE and go to Sketch > Include Library > Manage Libraries. The Library Manager should open.
Search for “DHT” on the Search box and install the DHT library from Adafruit.
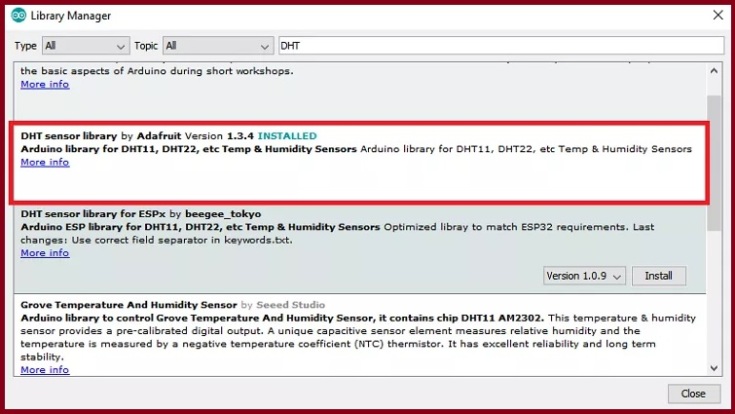
After installing the DHT library from Adafruit, type “Adafruit Unified Sensor” in the search box. Scroll all the way down to find the library and install it.
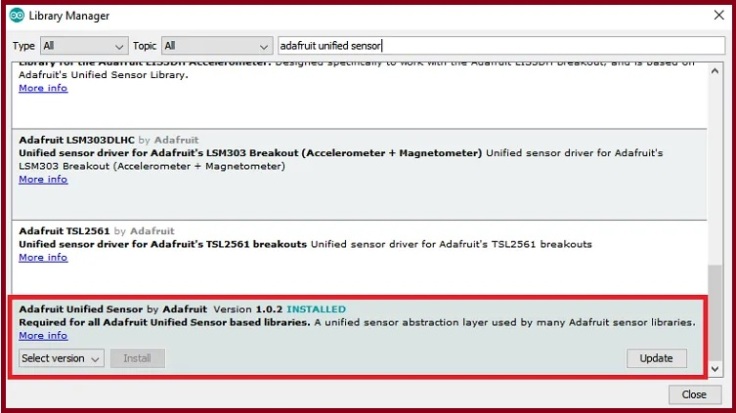
After installing the libraries, restart your Arduino IDE.
Code –
After installing the necessary libraries, you can upload an example code from the library.
In your Arduino IDE, go to File > Examples > DHT Sensor library > DHTtester
/*
Author:Dharmendra Kumar Yadav
*/
#include "DHT.h"
#define DHTPIN 2 // what pin we're connected to
// Uncomment whatever type you're using!
#define DHTTYPE DHT11 // DHT 11
//#define DHTTYPE DHT22 // DHT 22 (AM2302)
//#define DHTTYPE DHT21 // DHT 21 (AM2301)

// Initialize DHT sensor for normal 16mhz Arduino
DHT dht(DHTPIN, DHTTYPE);

void setup() {
Serial.begin(9600);
Serial.println("DHTxx test!");

dht.begin();
}

void loop() {
// Wait a few seconds between measurements.
delay(2000);

// Reading temperature or humidity takes about 250 milliseconds!
// Sensor readings may also be up to 2 seconds 'old' (its a very slow sensor)
float h = dht.readHumidity();
// Read temperature as Celsius
float t = dht.readTemperature();
// Read temperature as Fahrenheit
float f = dht.readTemperature(true);

// Check if any reads failed and exit early (to try again).
if (isnan(h) || isnan(t) || isnan(f)) {
Serial.println("Failed to read from DHT sensor!");
return;
}

// Compute heat index
// Must send in temp in Fahrenheit!
float hi = dht.computeHeatIndex(f, h);

Serial.print("Humidity: ");
Serial.print(h);
Serial.print(" %\t");
Serial.print("Temperature: ");
Serial.print(t);
Serial.print(" *C ");
Serial.print(f);
Serial.print(" *F\t");
Serial.print("Heat index: ");
Serial.print(hi);
Serial.println(" *F");
}
Troubleshooting tips-
- Wiring: when you’re building an electronics project, you need to double-check the wiring or pin assignment. After checking and testing that your circuit is properly connected, if it still doesn’t work, continue reading the next troubleshooting tips.
- Power: the DHT sensor has an operating range of 3V to 5.5V (DHT11) or 3V to 6V (DHT22). If you’re powering the sensor from the a 3.3V pin, in some cases powering the DHT with 5V solves the problem.
- Bad USB port or USB cable: sometimes powering the Arduino directly from a PC USB port is not enough. Try to plug it to a USB hub powered by an external power source. It might also help replacing the USB cable with a better or shorter one. Having a USB port that supplies enough power or using a good USB cable often fixes this problem.
- Power source: as mentioned in the previous tip, your Arduino might not be supplying enough power to properly read from the DHT sensor. In some cases, you might need to power the Arduino with a power source that provides more current.
- Sensor type: double-check that you’ve uncommented/commented in your code the right sensor for your project. In this project, we were using the DHT11:
#define DHTTYPE DHT11   // DHT 11
//#define DHTTYPE DHT22   // DHT 22  (AM2302), AM2321
//#define DHTTYPE DHT21 // DHT 21 (AM2301)- Sampling rate: the DHT sensor is very slow getting the readings (the sensor readings may take up to 2 seconds). In some cases, increasing the time between readings solves the problem.
- DHT sensor is fried or broken: unfortunately, these cheap sensors sometimes look totally fine, but they are fried/broken. So, even though you assembled the right circuit and code, it will still fail to get the readings. Try to use a different sensor to see if it fixes your problem.
- Wrong baud rate or failed to upload code: if you don’t see anything in your Arduino IDE Serial Monitor double-check that you’ve selected the right baud rate, COM port or that you’ve uploaded the code successfully.
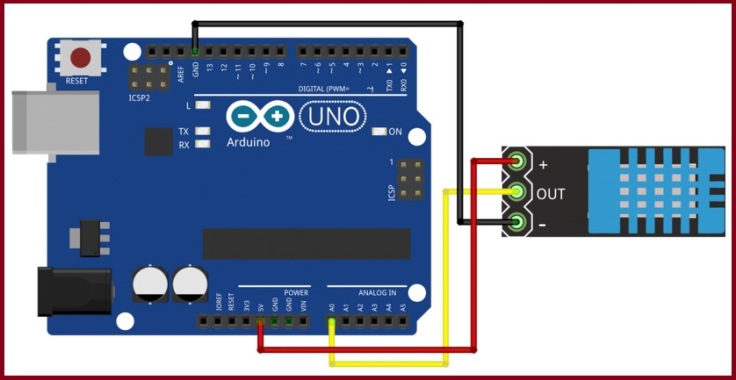
Schematic to interface DHT11/22 with Analog pin –
Circuit diagram to wire the DHT11 (or DHT22) temperature and humidity sensor to the Arduino on Analog pin.
| DHT Pin | Arduino |
| Pin 1 | 5V |
| Pin 2 | Analog pin Ao |
| Pin 3 | Gnd |
Code-
Since we will be using a Library that is available for this sensor, our code will be very short and simple.
/*
Author:Dharmendra Kumar Yadav
*/
#include "dht.h"
#define dht_apin A0 // Analog Pin sensor is connected to
dht DHT;
void setup(){
Serial.begin(9600);
delay(500);//Delay to let system boot
Serial.println("DHT11 Humidity & temperature Sensor\n\n");
delay(1000);//Wait before accessing Sensor
}//end "setup()"
void loop(){
//Start of Program
DHT.read11(dht_apin);
Serial.print("Current humidity = ");
Serial.print(DHT.humidity);
Serial.print("% ");
Serial.print("temperature = ");
Serial.print(DHT.temperature);
Serial.println("C ");
delay(5000);//Wait 5 seconds before accessing sensor again.
//Fastest should be once every two seconds.
}// end loop()
Applications-
HVAC, dehumidifier, testing and inspection equipment, consumer goods, automotive, automatic control, data loggers, weather stations, home appliances, humidity regulator, medical and other humidity measurement and control.

Leave a comment