
Introduction:
In this tutorial we will learn how to use a buzzer (or piezo speaker) with Arduino. Buzzers can be found in alarm devices, computers, timers and confirmation of user input such as a mouse click or keystroke.
Piezo buzzer is based on the inverse principle of piezo electricity discovered in 1880 by Jacques and Pierre Curie. It is the phenomena of generating electricity when mechanical pressure is applied to certain materials and the vice versa is also true. Such materials are called piezo electric materials.
Piezo electric materials are either naturally available or manmade. Piezoceramic is class of manmade material, which poses piezo electric effect and is widely used to make disc, the heart of piezo buzzer. When subjected to an electric field they stretch or compress, in accordance with the frequency of the signal thereby producing sound.
Required Hardware-
- Arduino uno
- Breadboard
- Buzzer/piezo speaker
- 100 Ohm resistor
Circuit Diagram-
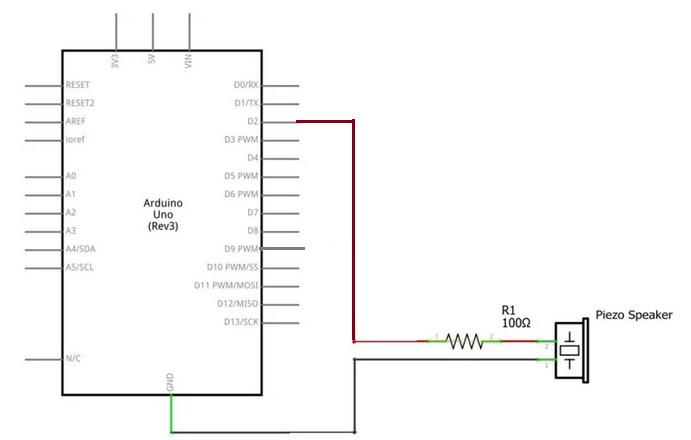
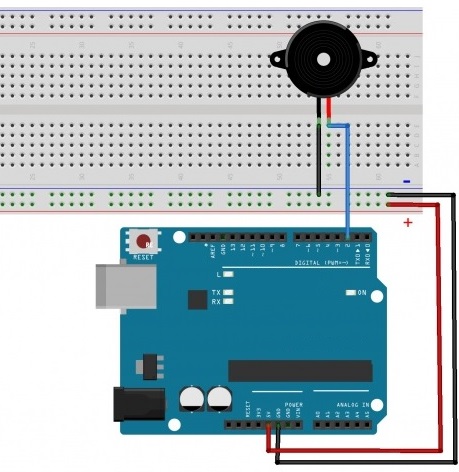
The Connections are pretty simple:
- Connect the Supply wire (RED) of the buzzer to the Digital Pin 2 of the Arduino through a 100 ohm resistor.
- Connect the Ground wire (BLACK) of the buzzer to any Ground Pin on the Arduino
Note: The resistor is used in order to protect the board/micro-controller from any damage due to the audio output device.if you will not use the the resistor it will also work resistor is used for safety of device only.
The Code
Code 1-Turn buzzer on/off:
const int Buzzer = 2;//buzzer at digital pin 2

void setup()
{
  pinMode(Buzzer, OUTPUT);//setting pin as output mode
}

void loop()
{
  digitalWrite(Buzzer, HIGH);//buzzerr high
  delay(400);
  digitalWrite(Buzzer, LOW);//buzzer low
  delay(2000);
}
Use the following code to generate an alarm type of sound
Code 2 – Playing a song:
Cicruit is same as above mentioned. Copy this code and upload to your Arduino board.
/*
Tone generation Tutorial
By Dharmendra kumar yadav
note 	frequency
  c     262 Hz
  d     294 Hz
  e     330 Hz
  f     349 Hz
  g     392 Hz
  a     440 Hz
  b     494 Hz
  C     523 Hz
*/

const int Buzzer = 2;
const int songLength = 18;

char notes[] = "cdfda ag cdfdg gf "; // a space represents a rest
int beats[] = {1,1,1,1,1,1,4,4,2,1,1,1,1,1,1,4,4,2};
int tempo = 150;  // Speed of tempo

void setup()
{
  pinMode(Buzzer, OUTPUT);
}

void loop()
{
  int i, duration;

  for (i = 0; i < songLength; i++) // step through the song arrays
  {
    duration = beats[i] * tempo;  // length of note/rest in ms

    if (notes[i] == ' ')          // is this a rest?
    {
      delay(duration);            // then pause for a moment
    }
    else                          // otherwise, play the note
    {
      tone(Buzzer, frequency(notes[i]), duration);
      delay(duration);            // wait for tone to finish
    }
    delay(tempo/10);              // brief pause between notes
  }


  while(true){}     // Remove this line if you want to play this song for ever.
}


int frequency(char note)
{
  int i;
  const int numNotes = 8;      // number of notes we're storing
  char names[] = { 'c', 'd', 'e', 'f', 'g', 'a', 'b', 'C' };
  int frequencies[] = {262, 294, 330, 349, 392, 440, 494, 523};

  for (i = 0; i < numNotes; i++)
  {
    if (names[i] == note)
    {
      return(frequencies[i]);
    }
  }
  return(0);
}
That’s All guys !! Stay tuned for More!!

Leave a comment