
Introduction to Arduino
What Is Arduino?
Arduino is an open source programmable circuit board that can be integrated into a wide variety of makerspace projects both simple and complex. This board contains a microcontroller which is able to be programmed to sense and control objects in the physical world. By responding to sensors and inputs, the Arduino is able to interact with a large array of outputs such as LEDs, motors and displays. Because of it’s flexibility and low cost, Arduino has become a very popular choice for makers and makerspaces looking to create interactive hardware projects.
Arduino was introduced back in 2005 in Italy by Massimo Banzi as a way for non-engineers to have access to a low cost, simple tool for creating hardware projects. Since the board is open-source, it is released under a Creative Commons license which allows anyone to produce their own board. If you search the web, you will find there are hundreds of Arduino compatible clones and variations available but the only official boards have Arduino in it’s name.
An Arduino Board is AVR microcontroller based board which follows the standard arduino schematic and is flashed with the arduino boot-loader.
Types of Arduino Boards
Arduino is a great platform for prototyping projects and inventions but can be confusing when having to choose the right board. If you’re brand new to this, you might have always thought that there was just one “Arduino” board and that’s it. In reality, there are many variations of the official Arduino boards and then there are hundreds more from competitors who offer clones. But don’t worry, we’re going to show you which one to start with later on in this tutorial.
Below are a few examples of the different types of Arduino boards out there. The boards with the name Arduino on them are the official boards but there are also a lot of really great clones on the market as well. One of the best reasons to buy a clone is the fact they are generally less expensive than their official counterpart. One word of caution, be careful when buying boards from companies you don’t know.

Another factor to consider when choosing a board is the type of project you are looking to do. For example, if you want to create a wearable electronic project, you might want to consider the LilyPad board. The LilyPad is designed to be easily sewn into e-textiles and wearable projects. If your project has a small form factor, you might want to use the Arduino Pro Mini which has a very small footprint compared to other boards.
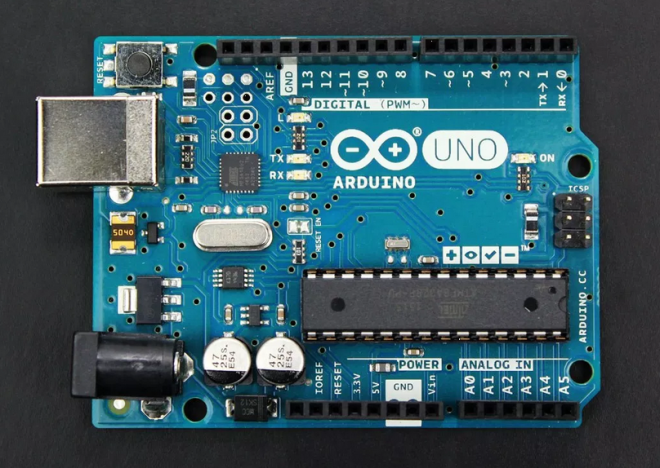
Arduino Uno
One of the most popular Arduino boards out there is the Arduino Uno. While it was not actually the first board to be released, it remains to be the most actively used and most widely documented on the market. Because of its extreme popularity, the Arduino Uno has a ton of project tutorials and forums around the web that can help you get started or out of a jam. We’re big fans of the Uno because of it’s great features and ease of use.

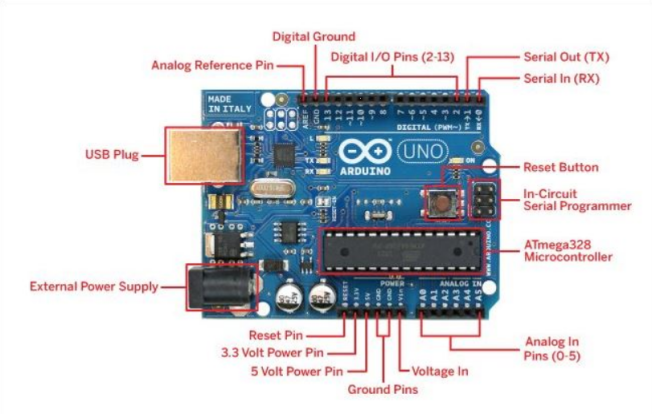
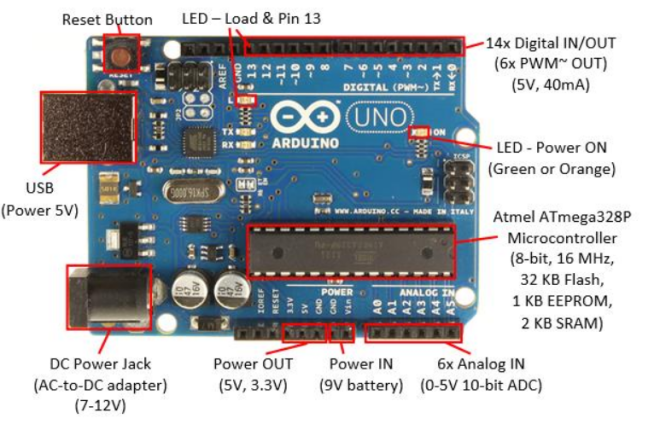
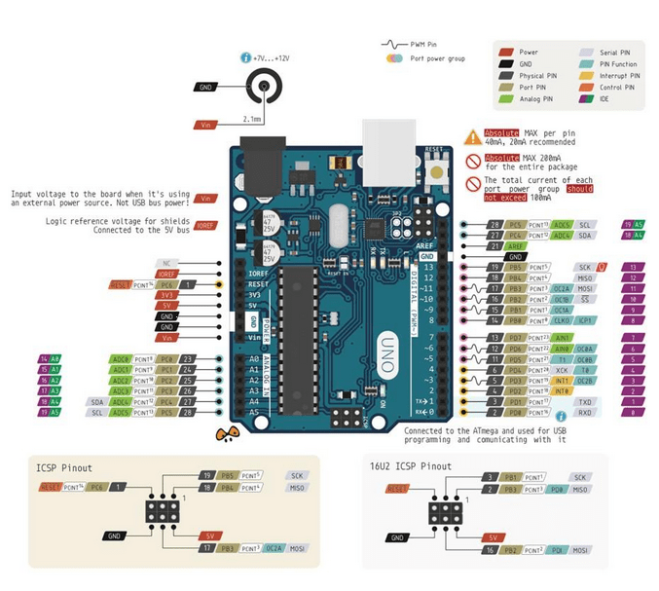
Board Breakdown
Here are the components that make up an Arduino board and what each of their functions are.
- Reset Button – This will restart any code that is loaded to the Arduino board
- AREF – Stands for “Analog Reference” and is used to set an external reference voltage
- Ground Pin – There are a few ground pins on the Arduino and they all work the same
- Digital Input/Output – Pins 0-13 can be used for digital input or output
- PWM – The pins marked with the (~) symbol can simulate analog output
- USB Connection – Used for powering up your Arduino and uploading sketches
- TX/RX – Transmit and receive data indication LEDs
- ATmega Microcontroller – This is the brains and is where the programs are stored
- Power LED Indicator – This LED lights up anytime the board is plugged in a power source
- Voltage Regulator – This controls the amount of voltage going into the Arduino board
- DC Power Barrel Jack – This is used for powering your Arduino with a power supply
- 3.3V Pin – This pin supplies 3.3 volts of power to your projects
- 5V Pin – This pin supplies 5 volts of power to your projects
- Ground Pins – There are a few ground pins on the Arduino and they all work the same
- Analog Pins – These pins can read the signal from an analog sensor and convert it to digital
Arduino boards are able to read inputs – light on a sensor, a finger on a button, or a Twitter message – and turn it into an output – activating a motor, turning on an LED.The arduino is referred as open source hardware.
The arduino board has all the required circuitry to get the built-in AVR microcontroller running. The output or inputs can be taken from the boards or given to the board using convenient connectors. Both digital and analog inputs and outputs are available in all arduino boards.
The open-source Arduino Software (IDE) makes it easy to write code and upload it to the board.The arduino IDE is also open source and anybody can contribute their libraries to the arduino. The Arduino project provides the Arduino integrated development environment (IDE), which is a cross-platform application written in the programming language Java. The Arduino IDE supports the languages C and C++ using special rules to organize code. The Arduino IDE supplies a software library called Wiring from the Wiring project, which provides many common input and output procedures. A typical Arduino C/C++ sketch consist of two functions that are compiled and linked with a program stub main() into an executable cyclic executive program:
- setup(): a function that runs once at the start of a program and that can initialize settings.
- loop(): a function called repeatedly until the board powers off.
After compiling and linking with the GNU toolchain, also included with the IDE distribution, the Arduino IDE employs the program avrdude to convert the executable code into a text file in hexadecimal coding that is loaded into the Arduino board by a loader program in the board’s firmware.
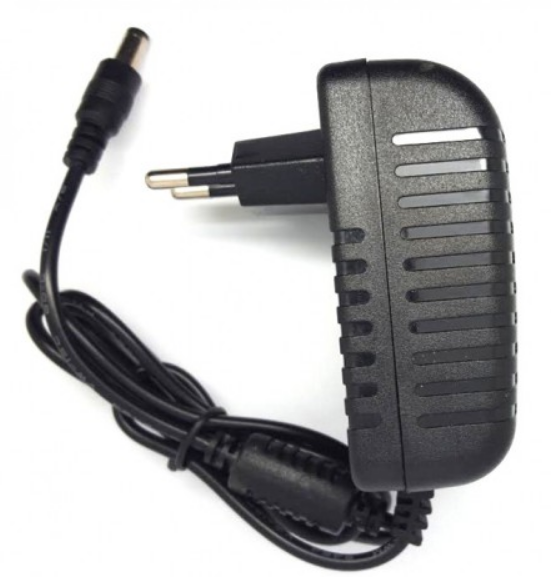
Arduino Power Supply
The Arduino Uno needs a power source in order for it to operate and can be powered in a variety of ways. You can do what most people do and connect the board directly to your computer via a USB cable. If you want your project to be mobile, consider using a 9V battery pack to give it juice. The last method would be to use a 9V AC power supply.

Leave a comment