
Introduction-
The LM35 is an ideal temperature sensor for measuring ambient temperature. It provides a linear output proportional to the temperature, with 0 V corresponding to 0 degrees C and an output voltage change of 10 mV for each degree C change. LM35s are easier to use than thermistors and thermocouples because they are so linear and require no signal conditioning.


LM35 is an analog temperature sensor. This means the output of LM35 is an analog signal. Micro controllers don’t accept analog signals as their input directly. We need to convert this analog output signal to digital before we can feed it to a microcontroller’s input. For this purpose, we can use an ADC( Analog to Digital Converter).If we are using a basic microcontroller like 8051, we need to use an external ADC to convert analog output from LM35 to digital. We then feed the output of ADC ( converted digital value) to input of 8051. But modern day boards like Arduino and most modern day micro controllers come with inbuilt ADC. Our arduino uno has an in built 10 bit ADC (6 channel). We can make use of this in built ADC of arduino to convert the analog output of LM35 to digital output. Since Arduino uno has a 6 channel inbuilt ADC, there are 6 analog input pins numbered from A0 to A5. Connect analog out of LM35 to any of these analog input pins of arduino.
Materials Required-
You will need :
- Arduino Uno
- LM35 Temperature Sensor.
- Breadboard.
- Some connecting wires.
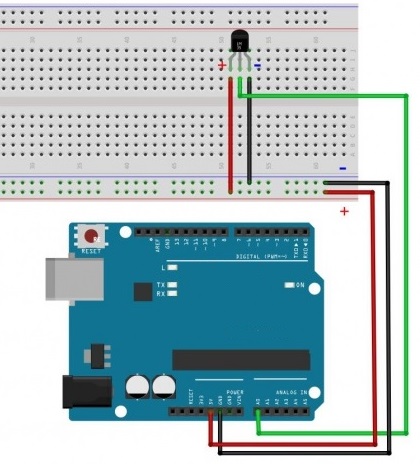
Circuit Diagram-
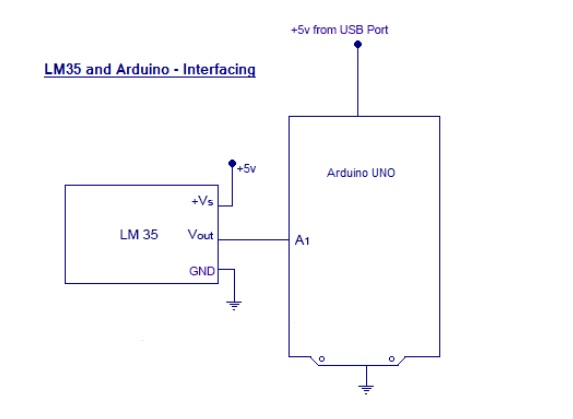
Connect the temperature sensor to board
- Connect the +Vs to +5v on your Arduino board.
- Connect Vout to Analog0 or A0 on Arduino board.
- Connect GND with GND on Arduino.
The Analog to Digital Converter (ADC) converts analog values into a digital approximation based on the formula ADC Value = sample * 1024 / reference voltage (+5v). So with a +5 volt reference, the digital approximation will = input voltage * 205.
LM35 is available in the market in 3 series variations – LM35A, LM35C and LM35D series. The main difference between these 3 versions of LM35 IC are in their range of temperature measurements. The LM35D series is designed to measure from 0 degree Celsius to 100 degree Celsius, where as the LM35A series is designed to measure a wider range of -55 degree Celsius to 155 degree Celsius. The LM35C series is designed to measure from -40 degree Celsius to 110 degree Celsius.
Code-
Compile and upload this program to your Arduino uno board via Arduino IDE
/*
Author:Dharmendra Kumar Yadav
*/
#define TempPin A0
int TempValue;
void setup()
{
  Serial.begin(9600); // Initializing Serial Port
}
void loop()
{
  TempValue = analogRead(TempPin); // Getting LM35 value and saving it in variable
  float TempCel = ( TempValue/1024.0)*500; // Getting the celsius value from 10 bit analog value
  float TempFarh = (TempCel*9)/5 + 32; // Converting Celsius into Fahrenhiet

  Serial.print("TEMPRATURE in Celsius = "); //Displaying temperature in Celsius
  Serial.print(TempCel);
  Serial.print("*C");
  Serial.print("    |    ");
  Serial.print("TEMPRATURE = "); // Displaying Temperature in Fahrenheit
  Serial.print(TempFarh);
  Serial.print("*F");
  Serial.println();

  delay(1000);

}
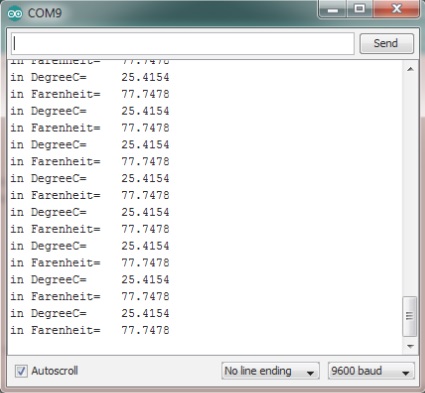
The Output Screenshot of Serial Monitor

Leave a comment