
Serial installation in Raspberry Pi 3
This is the third part of our Raspberry Pi tutorial series, in this post i will show you, how to configure Serial Communication,I2C,PIL,Opencv and MQTT server in Raspberry Pi 3
Raspberry Pi 3’s are great little beasts,However, in order to use the Bluetooth correctly the /dev/ttyAMA0 has been “stolen” from the GPIO header and an inferior second one has been substituted in it’s place. No-one will ever know! Unfortunately /dev/ttyAMA0 was a hardware serial port (UART) and high performance (hence it was nabbed for the Bluetooth) and the second port is partly software and a bit flaky. Many people’s applications got broken.
The second serial port you will see referred to as the “mini uart” and lives at /dev/ttyS0. It also calculates it’s bit timing’s from the CPU cores frequency and if the CPU is under heavy load it can corrupt the serial communications. Not good.
In order to work around this, many people “fix” the CPU core frequency so that the serial port is stable. This comes at a slight loss in performance (though normally not noticeable). I’ll describe how you do this in the next section.
By the way, it’s not all bad for the change of serial port on the Raspberry Pi 3. The Arduino IDE expects the serial communications to be on /dev/ttyS0 so you have no work to do to map the serial ports across.
To summarise the ports on a Raspberry Pi 3 and be crystal clear:
/dev/ttyAMA0 -> Bluetooth
/dev/ttyS0 -> GPIO serial port.
If you stick with these as is, your Bluetooth will work as nature intended AND you can use a serial port over the GPIO there is a way of swapping the serial ports around if you don’t want to use the Bluetooth .
Step 1 –this won’t necessary if you have Rasbian new release Update the system with:
sudo apt-get update
sudo apt-get upgradeStep 2 – Device Tree settings as below:
Add device tree to /boot/config.txt to disable the Raspberry Pi 3 bluetooth.
sudo nano /boot/config.txtAdd at the end of the file
enable_uart=1
*if you want to change the blutooth to miniuart port(this is bad option)
dtoverlay=pi3-miniuart-btif you want to disable the blutooth(this is good option but bluetooth will be off)
dtoverlay=pi3-disable-btExit the editor saving your changes.
Step 3 – reboot the pi
sudo rebootTo Enable the Serial Console edit the file using
sudo nano /boot/cmdline.txt
Change the file to the following:
dwc_otg.lpm_enable=0 console=tty1 root=/dev/mmcblk0p2 rootfstype=ext4 elevator=deadline fsck.repair=yes rootwait

Exit and save your changes
Step 4 – Reboot the pi
serial installation completed
I2C Installation for Raspberry Pi – Step by
Make sure your Raspberry Pi is connected to the internet when installing the drivers.
- Run
sudo raspi-config. - Use the down arrow to select
5 Interfacing Options - Arrow down to
P5 I2C. - Select
yeswhen it asks you to enable I2C - Also select
yesif it asks about automatically loading the kernel module. - Use the right arrow to select the
<Finish>button. - Select
yeswhen it asks to reboot
After rebooting the system
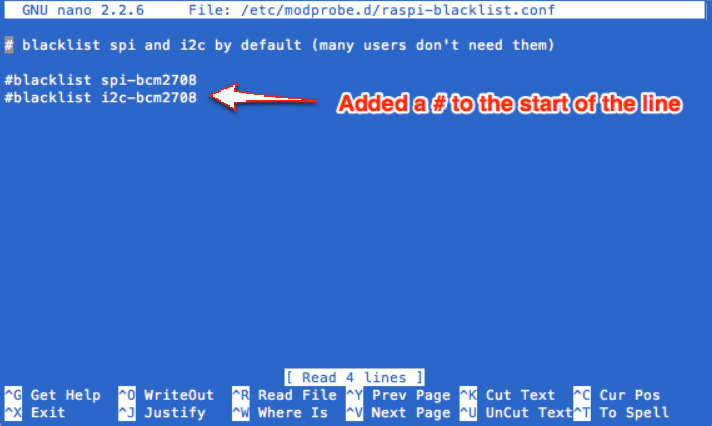
sudo nano /etc/modprobe.d/raspi-blacklist.conf
then add a # on the 3rd line.
Press CTRL X then y to save and exit.
 Next edit the modules file by:
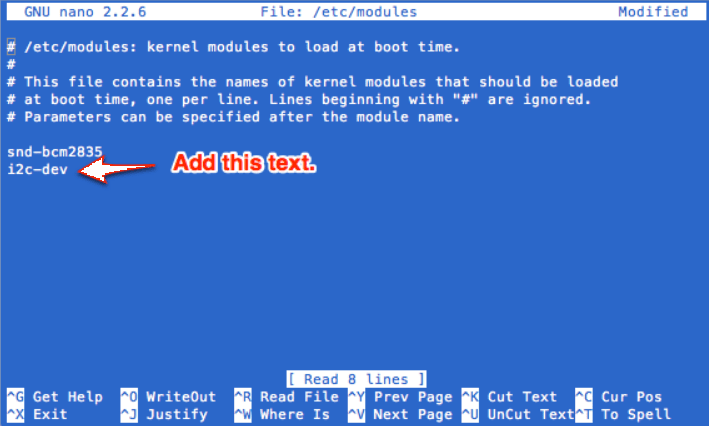
sudo nano /etc/modules
Add i2c-dev to a new line.
Press CTRL X then y to save and exit.
Now install the i2c-tools package by:
sudo apt-get install i2c-tools
If you get a 404 error do an update first:
sudo apt-get update
then run the install the i2c-tools again.
sudo reboot
After the reboot test to see any device connected by:
sudo i2cdetect -y 0

You should see something like this:
Next install the python-smbus python module:
sudo apt-get install python-smbus
Now you are ready to use the i2c with python.

Leave a comment